Subscription Booking | Schedule subscription, subscription emails, subscription payments
Subscription booking has been developed for organisations that have a weekly training sessions and you want to charge per timeslot and not a large upfront fee.
Subscription is a add on feature. Please consult your crm lead to learn more on how it could benefit your business
Subscription schedules/bookings can be applied to selected schedules only and does not need to be applied to all schedules
Below documents the subscription model from setup, to website displays and automated emails.
Creating a schedule as a subscription schedule i.e. charge per week, per timeslot
Login as Admin
Open courses > schedules
Add schedule - general setup
To configure the schedule to be subscription, follow the below steps to setup correctly
Timeslots tab > bulk generate your multiple timeslots
Booking Tab > select booking type = Subscription
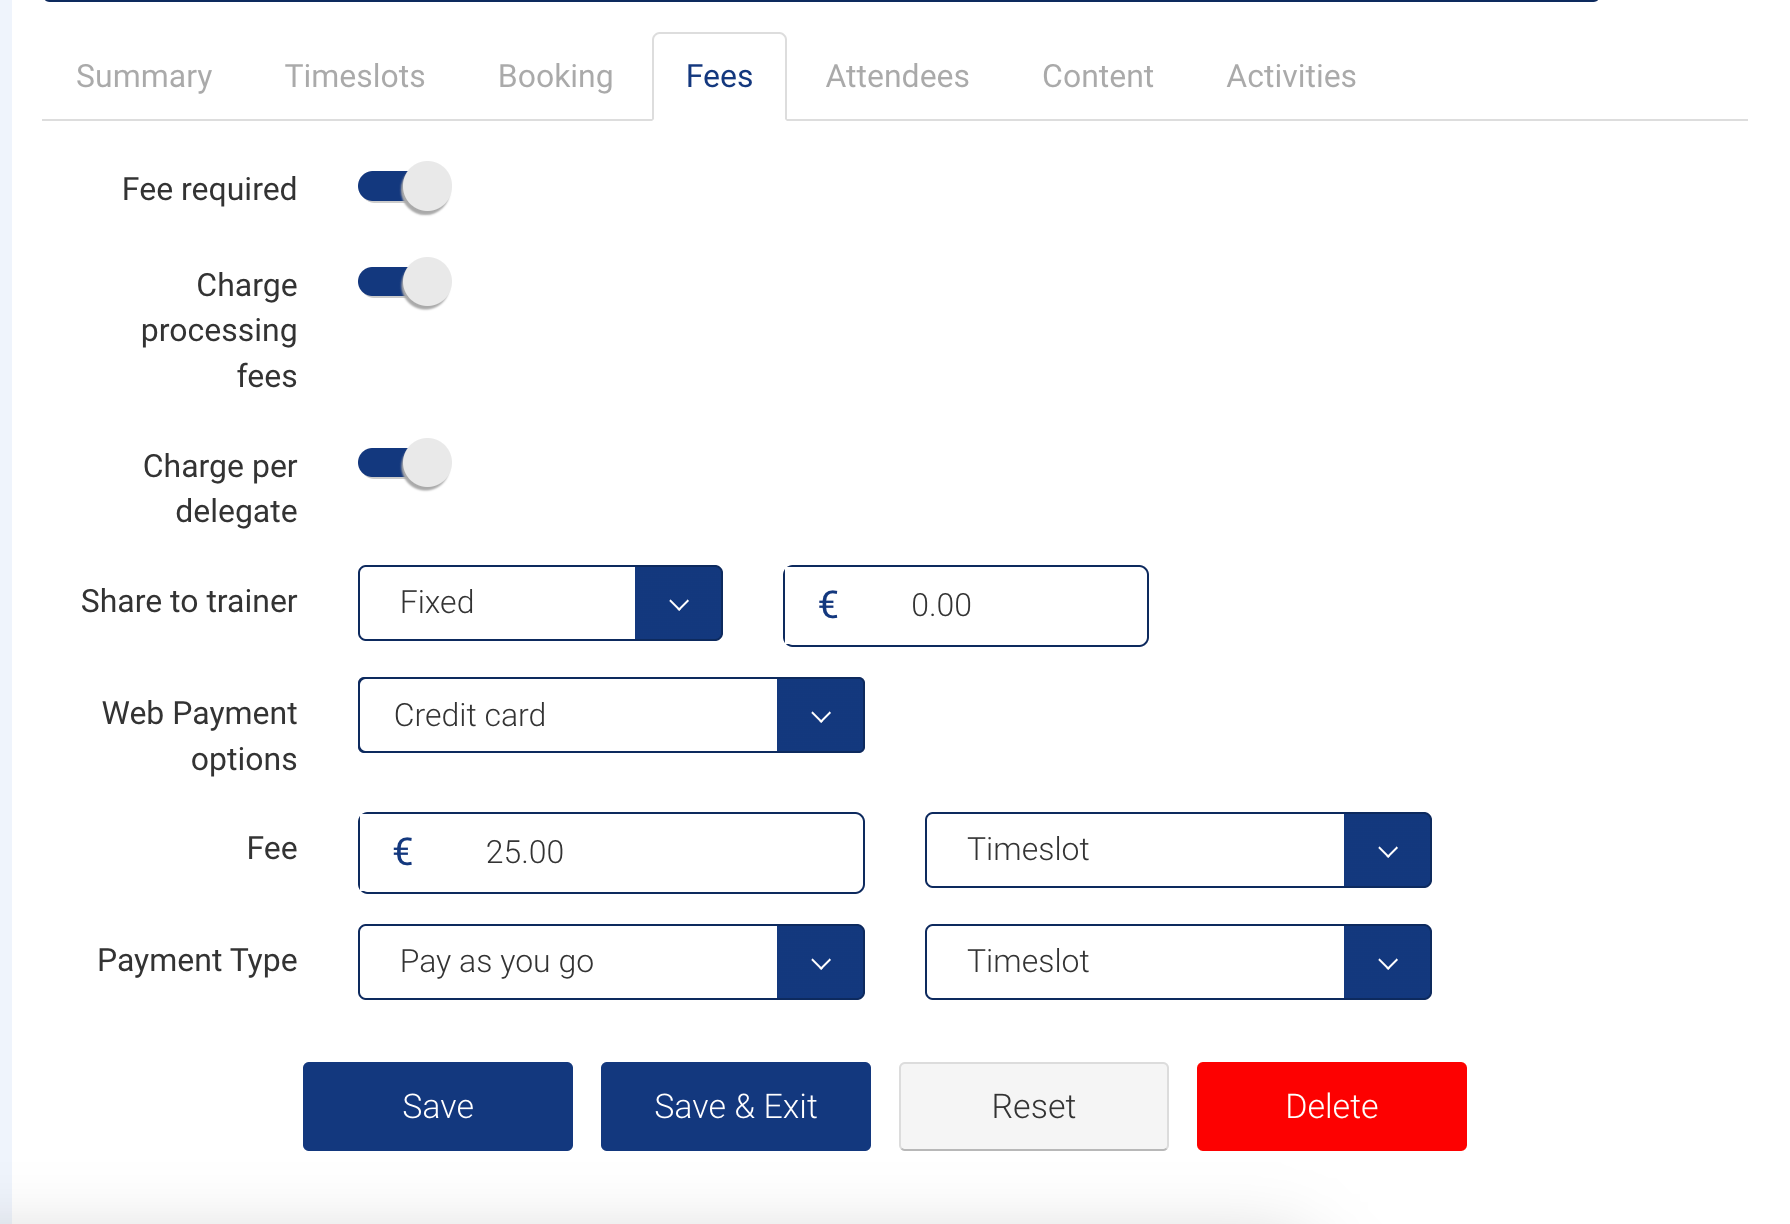
Fees tab >
Fee input - enter price per week + Timeslot (changing from the default Schedule)
Payment type - select Pay As You Go and Timeslot
If you can’t see these inputs, the subscription model has not been configured on your link yet
Creating booking for Subscription Schedules
The easiest way to setup subscription booking is asking the Payer to complete the booking via the checkout and not by the admin. This is due to saving the credit card details on the checkout.
When someone books the course via the website, they will be asked to save their card details for future automatic payments.
This means, the card is saved to the bookers portal for all future payments, for that booking.
No payment is taken when the booking is made. First payment is made before the first timslot - see suggested payment schedule below
Example - Parent A books Child 1 onto weekly English course their visa. Parent B books child 1 onto onto weekly Maths course using their Mastercard.
The same child 1 is attending x2 different courses
Each week, payments for English will be taken from Parent A visa and payments for Maths will be taken from Parent B Mastercard.
When the Booker is also attending the training i.e. student
When the booker is also the person attending the training, the card they saved on file is the card that will be charged weekly.
Admin need to create the booking, how to setup automatic payments
If this is the case, and the student can’t complete the booking themselves via the website and they want to be setup with automatic payments, the student will need to save the card via their portal
The process is
Admin creates the booking
Student, attending the training must login to their portal
Go to profile > Save card
Add their credit card information
Parents or lead bookers are unable to save the card information to their own portal since they are not linked to the booking.
Admin need to create the booking, and the booker does not want to pay weekly via automatic payments
This worflow can be handled also and is much more manual i.e. admin must receive the payment manually each week and update the students accounts. See steps below
Admin can create booking for the student
Each week a new outstanding transaction will be created (this is the process for all subscription bookings)
A payment run will attempt to take payment via the saved credit card
As there is no card saved, no payment will be taken
An outstanding transaction will remain on the account
Admin must manually chase this outstanding payment
Once received (via card machine, cash..etc) admin must update the transaction
Open the contacts file
Select accounts
Select the transaction
Select Actions
Select make a payment
Enter the amount received
Save
Outcome: the payment will be made for the outstanding transaction for that weekly grind.
Subscription and Payment process for Subscription Bookings.
See process below on a suggested subscription model
Action | When | Action | Outcome |
|---|---|---|---|
Checkout: booking confirmed for subscription schedule | immediately | Automatically send a templated subscription booking confirmation email | The booker of the schedule will receive a booking confirmation specific to subscription type courses |
Create outstanding transaction for upcoming timeslot | 2 days before timeslot starts At 15:00 | Create outstanding tx and apply to attendees accounts tab | An outstanding transaction is created for the attendee, upcoming timeslot |
Reminder email to Payer | 2 day before transaction is due (due date is the timeslot start date) At 15:30 | Send a reminder email to the payer to let them know a payment will be attempted tomorrow for the upcoming timeslot | reminder email will be sent |
Payment attempt 1 | 2 days before the timeslot start date a payment will be attempted At 16:00 | Automation will attempt to take payment for the outstanding transaction created the day before | Stripe will process payments automatically where credit card is saved and has sufficient funds. |
Payment attempt 2 | 1 day before the timeslot start date a payment will be attempted At 17:00 | Where a payment failed the previous day | |
Payment successful - Email Payer | immediately | Send email to Payer confirming payment received | Payer receives confirmation email |
Payment Unsuccessful - Email Payer | immediately | Email Payer and Admin with reason | TX will remain outstanding and can be attempted again / manually updated by Admin The email includes the stripe reason for failing eg InSuff Funds, expired Card |
Attempts to retrieve payment has been configured to attempt x2 times before the timeslot starts. If it does not retrieve the payment on the second attempt, the payment will remain outstanding
How to update an Expired Card
This might be a common failed payment reason from Stripe. To update the card you will need to ask the payer or student to delete the expired card and update with their new card information.
Advising your customers to update their card details.
Ask the contact to login to their portal
Ask them to navigate to the left menu > profile
Select Saved Card menu
Select Delete Card
Select Add Card Menu
Add new card details
Outcome: the new card has been added and all future automatic payments will use the updated card.