Adding E-learning Content to a Schedule (Trainer led or self paced schedule)
Creating online content with CourseCo is an easy way to share your course material with your learners. To create online content, follow the steps given below:
1. Log in as an Admin.
2. Navigate to Courses > Schedules.
The Schedules page will be displayed.
3. Click ADD SCHEDULE.
Please make sure that your schedule is set up correctly whether it is trainer-led or self-paced
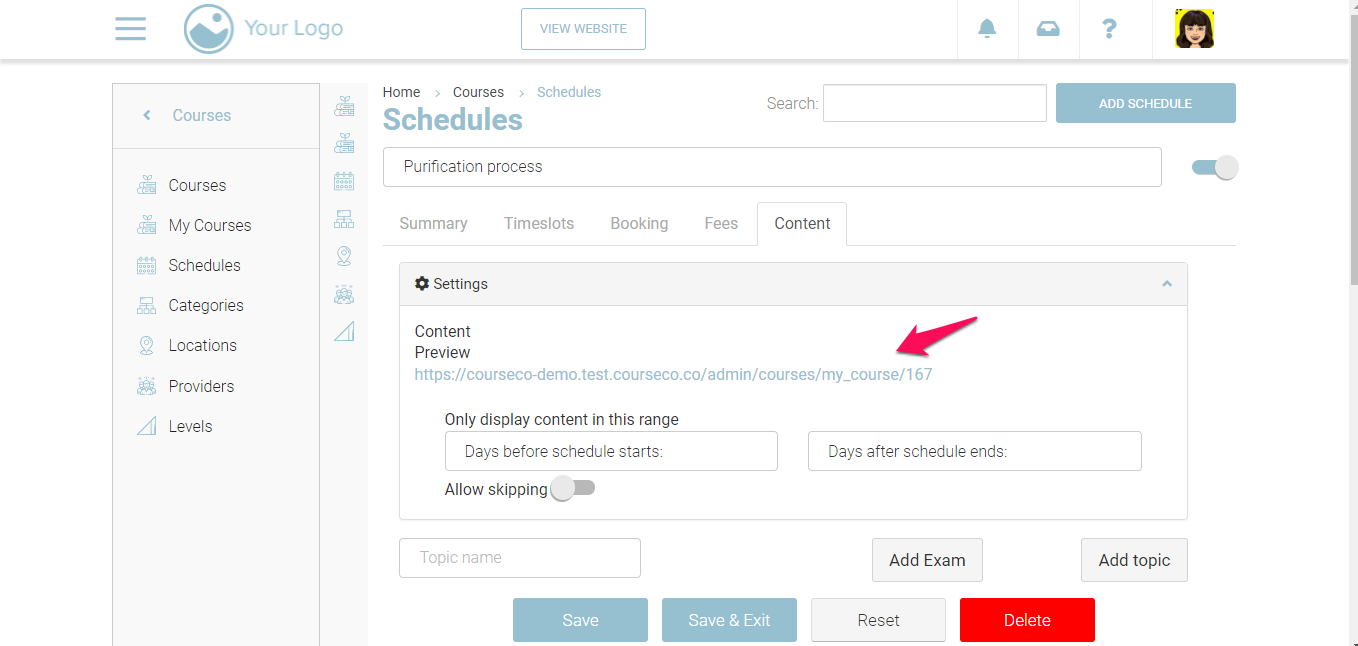
4. Click the Content tab.
This is where you will add the course content for the booked student to access via their portal
The Content tab allows you to add E-learning material to your schedule so that your learners can access this information via their portal
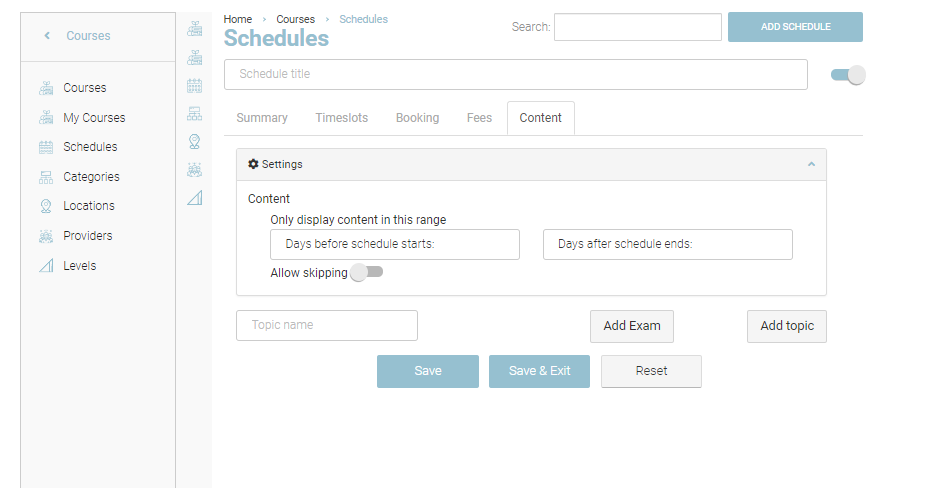
Content - Settings / Managing Content access
5. Managing Content access Click Settings. To display the content for a number of days before the schedule starts and after it ends, select the number of days for the
Days before schedule starts and Days after schedule ends fields. You can use this feature if you plan to update the content gradually for your students to see.
Self paced course - ensure you set Days before schedule = 0, Days after schedule = number of days they have access to the content for!
Example - you want a student to access to the course for 60 days, enter 0 in box ‘Days before…’ and enter 60 in box ‘Days after..’

Preview Link - Once you have added content and saved the schedule, you will also see a link where you will be able to preview your E-Learning content as a learner.
6. If you want to allow students to skip a section, enable the Allow skipping option.
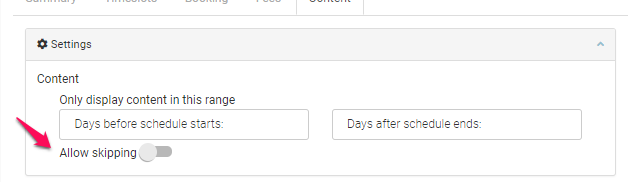
Ensure you do not enable ‘Allow Skipping’ IF you have multiple exams where ‘block until pass rate is met’ ON
Your student will experience issues with completing the exam if all skipping is on and he has not passed the exam in the previous section
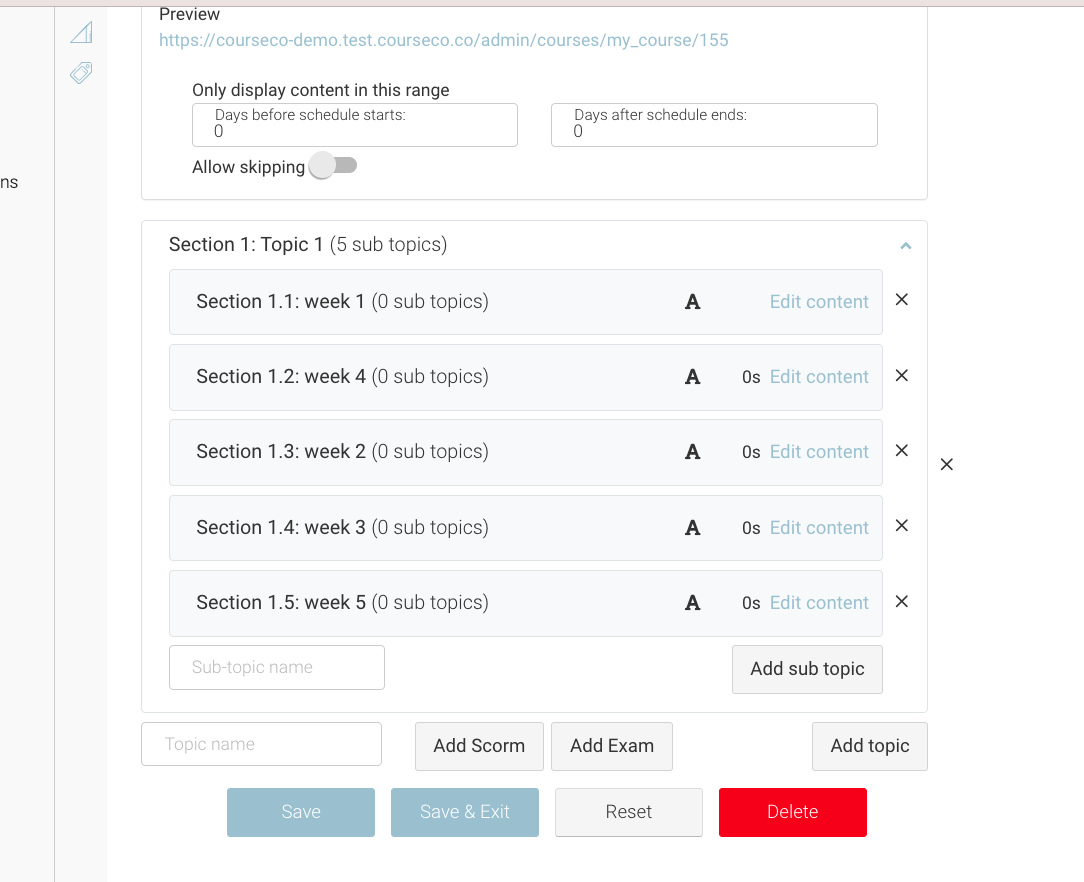
7. Enter the title of your topic of your course in the Section label field. Depending on the theme of your course, the section labels can be Chapter, Section, Part, and so on.
8.To add topics to the schedule, enter the name of the topic and click Add topic. Repeat this step to add as many topics as you want.
The topic will be added and displayed.
9. To add a sub-topic under a topic, expand the topic section by clicking on it. Enter the name of the sub-topic and click Add sub-topic.
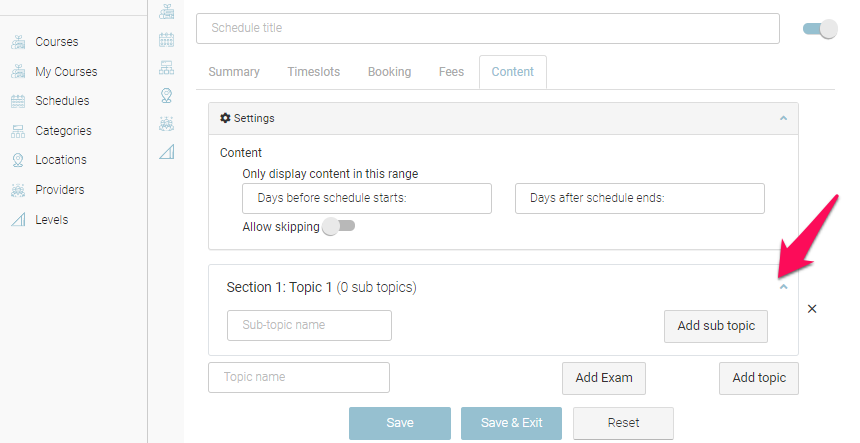
The sub-topic will be added and displayed.
This is where your E-learning content will be added
To delete a topic click the X icon.
To reorder topics, drag and drop them in the order of your choice.
10. Click Save or Save & Exit.
Your E-learning content will be created.
Building out your topics and Sub-topics is like building out your chapters of a book, you have chapters and sub headings. Other people see it like building power point slides. Ensure you consider this when titling your eg Section 1 and sub topics!
Adding Text based content in a section
This section explains the process of adding different type of content to the sub-topics of your course material.
To add the text, follow the steps given below:
1. Click Add content next to the Sub- topic to which you want to add content.
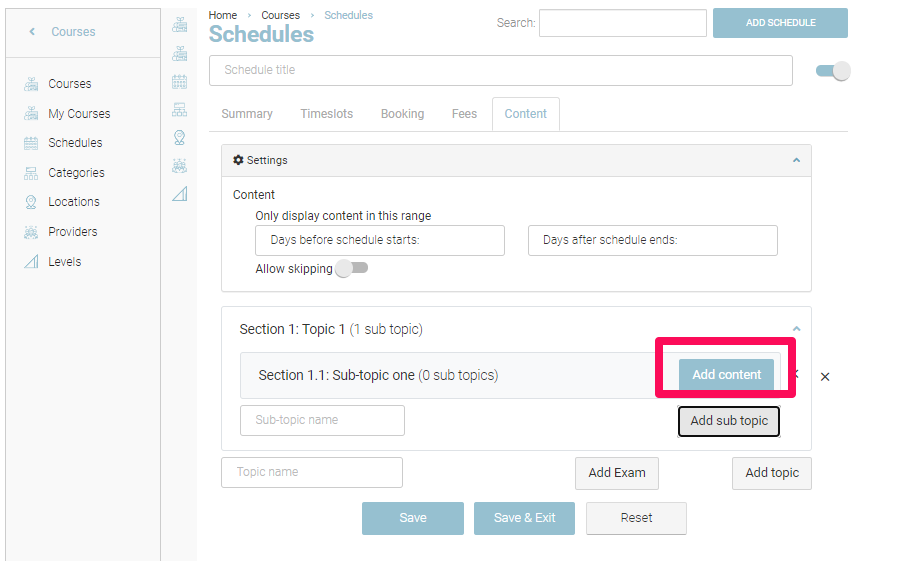
The Add content dialog will be displayed. By default, the sub-topic name will be displayed and the content type will be selected as Text.
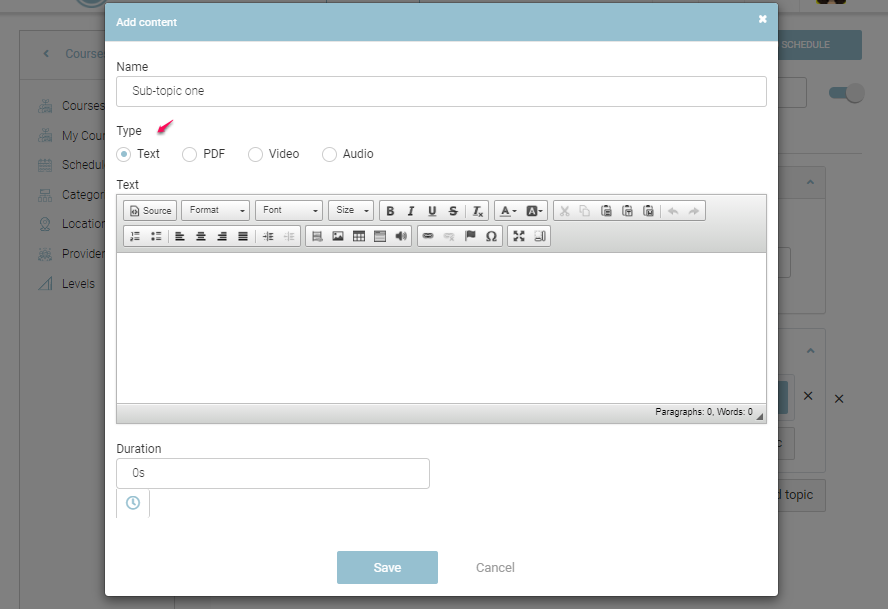
2. Enter your text in the Text text editor.
If you have pre-written text, you can just copy and paste it into the editor.
3. You can add the Duration for your text content in the Duration input. This will be a timer displayed to the student eg 30s, student can’t process for 30s *optional!
7. Click Save.
Outcome: The text content will be saved and added on the sub-topic.
Adding PDF File as Content
This section explains the process of adding PDF to the sub-topics of your course. To add a PDF, follow the steps given below:
1. Click Add content next to the subtopic to which you want to add the PDF.
The Add content dialog will be displayed.
2. In the Type field, select the option PDF.
The option to upload the PDF file will be displayed.
You can either drag and drop the file or upload it from your local system or browse and select a file from the list of available files.
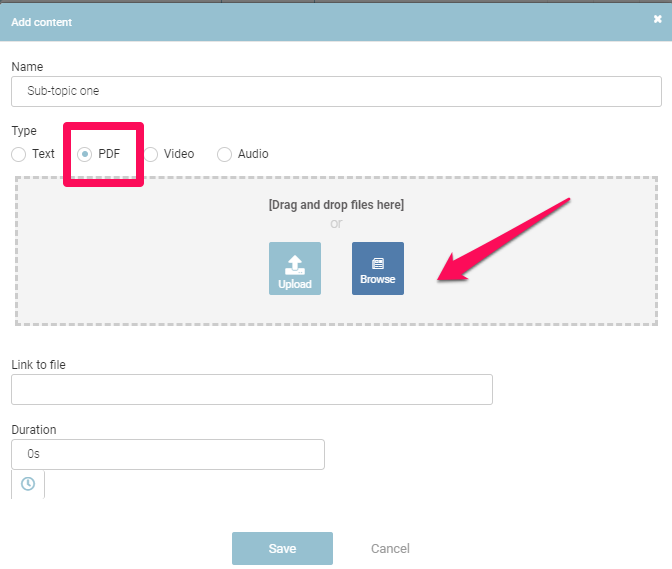
3. Perform one of the following:
Drag the PDF file and drop it into the Drag and drop files here field. OR
Click Upload, select the PDF file from your local system and click Open. OR
Click Browse and select the PDF file from the Available files dialog.
The PDF file will be uploaded and the link to the file will be displayed in the Link to file field.
4. You can add the Duration to view your PDF content in the Duration input.
5. Click Save.
Outcome: The PDF will be added saved and added to the sub- topic.
We really don’t recommend adding PDF. PDF on eg mobile is cumbersome and also, your content can be locally downloaded for booked delegates to access whenever they need. To keep your content unique, We suggest adding text based content with images.
Adding a Video File as Content
This section explains the process of adding videos to the sub-topics of your course. To add a video, follow the steps given below:
1. Click Add content next to the subtopic to which you want to add the video.
2. In the Type field, select the option Video.
The option to upload the video file will be displayed.
We don’t suggest uploading your own MP4 files as this can take up a lot of space on your server. We highly recommend using Vimeo/Youtube to host your files. All you need to do is copy the URL and embed in the ‘Link to File’ input

If you opt to upload an MP4, You can either drag and drop the file or upload it from your local system or browse and select a file from the list of available files.
3. Perform one of the following:
Drag the Video file and drop it into the Drag and drop files here field. OR
Click Upload, select the Video file from your local system and click Open. OR
Click Browse and select the Video file from the Available files dialog.
The Video file will be uploaded and the link to the file will be displayed in the Link to file field.
4. To add a Youtube/Vimeo file, you need to open the youtube url and copy it. No special embed links are required.
5. Paste the external URL into the ‘Link to File’ input + save.
7. Click Save.
Outcome: The video will be saved and added on the sub- topic. The video will place inline with the content for the student. The student will not be redirected to Youtube or know it is hosted on youtube!
When uploading your videos to Youtube/Vimeo, ensure you mark them as ‘Unlisted’ this means no one will find them, only students completing the online course will be able to view these videos.
Adding an Audio File as Content
This section explains the process of adding audio files directly to sub-topics and adding audio files to text content.
Please note to title your audio file using 5 letter words only. For example, Test1_File1.mp3
Adding an Audio File
This section explains the process of adding audio files to the sub-topics of your course. To add an audio file, follow the steps given below:
1. Click Add content next to the subtopic to which you want to add the audio.
2. In the Type field, select the option Audio.
The option to upload the audio file will be displayed.
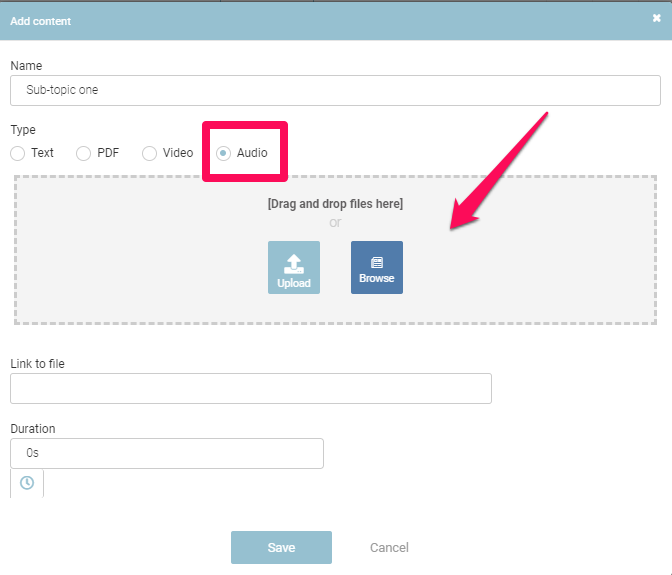
You can either drag and drop the file or upload it from your local system or browse and select a file from the list of available files.
3. Perform one of the following:
Drag the Audio file and drop it into the Drag and drop files here field. OR
Click Upload, select the Audio file from your local system and click Open. OR
Click Browse and select the Audio file from the Available files dialog.
The Audio file will be uploaded and the link to the file will be displayed in the Link to file field.
4. You can add the Duration to listen to your Audio content in the Duration input
8. Click Save.
Outcome: The audio will be saved and added to the sub- topic.
Adding an Audio File to text-based content
To add an audio file to the text-based content, follow the steps given below:
Login as Admin
First, you’ll need to Upload your MP3 file into the Media folder
3. Navigate to Media.
The Media page will be displayed.
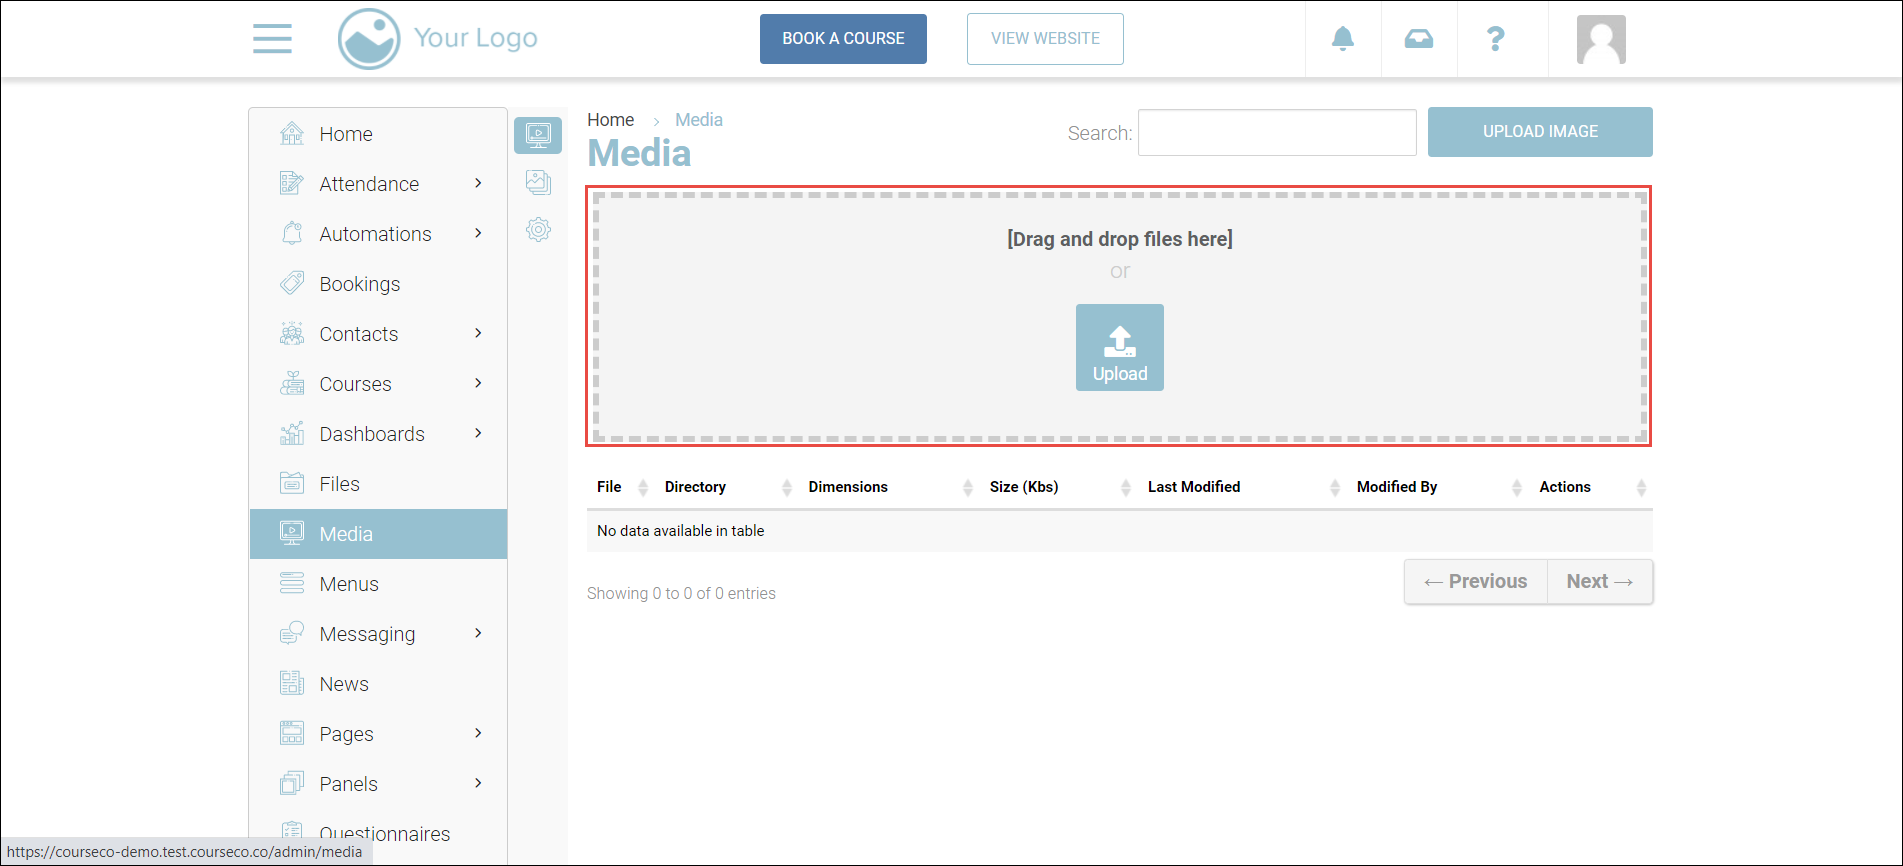
4. Drag the required media files from your local system and drop them into the Drag and drop files here field Or click Upload, select the files and click Open.
The selected files will be uploaded.
5. Navigate to the course page to which you want to add the audio file.
6. Click Add content in the row of the subtopic to which you want to add the text and audio file.
7. Enter the text in the Text text area.
If you have pre-written text, just copy and paste it into the editor.
8. Enter the audio name where you want it to be embedded/visible for your students, in the format: {audio name of your audio.mp3}. If the name of your audio file is risk-management-1.mp3, then enter {audio-risk-management-1.mp3}
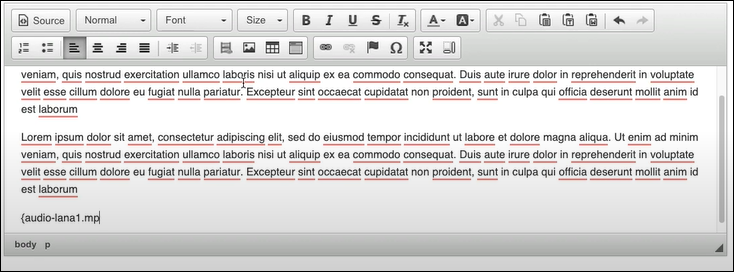
9. Enter the time duration you want to display the text and audio in the Duration field.
10. Click Save.
Outcome: The text and audio will be saved and added to the sub-topic.
Saving the Content on an Online Course
After creating and adding all the topics, sub-topics, and content to the course, you have to save the changes.

1. Click Save/Save & Exit.
The course creation will be completed.
2. You can also preview your content to see how it will look on the learner’s portal by accessing preview link available on content tab.
The preview link will appear once you save all your content on content tab
Editing the Position of your sections (if needed)
You can edit the position of content, you just need to Pull and drag to the desired location
Once you save the schedule, the content will be repositioned for the student booked onto the course.
Embedding an Exam
To embed an exam in the content tab for a schedule, please follow the article here: https://help.courseco.co/kb/Questionnaire.2462384164.html