Accounts AIQ
This guide is a detailed guide for the AIQ Custom Integration.
Sync Address and Email x AIQ
This feature helps administrators to synchronise Address and Email data fields from AIQ to CourseCo so that the data is always up-to-date. This synchronisation offers checking on both the Checkout and Back-office booking data changes. It syncs the address and email updates down to AIQ so that it is updated with the latest information.
Note: The Address and Email will only be updated when you create a website or back-office booking
Follow the steps to test this feature:
Go to your CourseCo link
Log in with your Admin Credentials
In the left menu, click on Contacts Plugin
Add an organisation and link your Org rep contact to the Organisation
Enter an address for your Organisation
Create a Booking for the Org rep
At this moment, a booking will be created therefore check your AIQ invoice to ensure the address displayed is the same as that which you entered while creating your booking in CourseCo
Recreate another booking and change the address,
If there is an update in the address for the organisation; the expected outcome at this stage is that you can see the updated address in the new AIQ invoice.
The data fields that are taken into account while syncing the information are: Organisation name, Address Line 1, Address Line 2, Address Line 3, County, Country, Postcode, Organisation Email, Organisation phone number
CourseCo is the master record for all Organisation Address and Email data fields and overrides information on AIQ
Coupon Codes x AIQ
Applying a coupon code to your Booking in CourseCo now offers sychronisations with AIQ. This means that your CourseCo data and AIQ data are always integrated for such data points.
Both the discount name and the amount of the discount or coupon amount applied on the booking will be reflected. This offers your accounts team ease of use managing your bookings because the data is always synchronised.
To apply a coupon code to a booking, follow these steps:
Navigate to your CourseCo link
Log in as admin
Go to the Bookings plugin
Click on Add Booking
Enter the Organisation name and the names of delegate(s) that you wish to add to the booking
Select the course that you wish to book
In the payment details section, click on the Add discount button
Note that the admin can only apply the coupon code for the back-office booking.
The Coupon code does not work on the website checkout
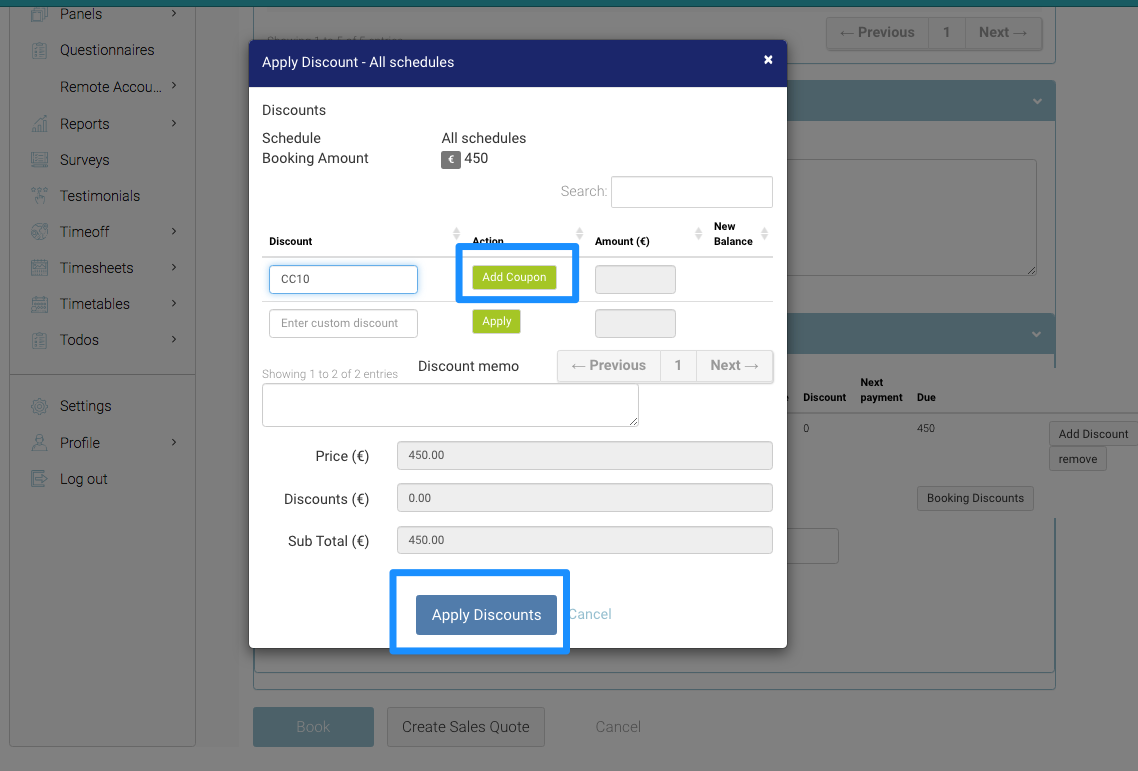
On the pop-up, enter the Coupon code and click on the Add coupon
See the price breakdown in the Price, Discounts and Sub-Total fields
Click on Apply Discounts
Click on Book button
Outcomes
Admins can manually add a coupon code in the back office booking anytime
The discount applied will be a percentage of the total cost
AIQ is sent the discount amount for the transaction which does not include the coupon title
The Booking Revenue report and the Deferred revenue report will be updated with all the information about the Coupon code and discounts applied to the relevant booking
Cancellation Process x AIQ
This feature is useful when you wish to cancel a delegate from a booking so that they are not confirmed on the booking and cancelled successfully from the transaction.
Simply, cancel a delegate from a group booking where the ‘charge per delegate’ is ON or OFF depending on your situation and preference. This feature links back to our In-company booking feature.
To cancel a delegate and see the outcomes for this feature, follow the steps:
Navigate to your CourseCo link
Log in as an admin
Go to the Bookings plugin
Search the Booking ID, Course Name, Schedule Name or start date in the Bookings List table
The search filter will display results matching your search
Select the Booking
You will be see all Booking details and the ‘Edit Booking’ option when you select the Booking
Click on ‘Cancel Booking’ button to cancel a delegate(s)
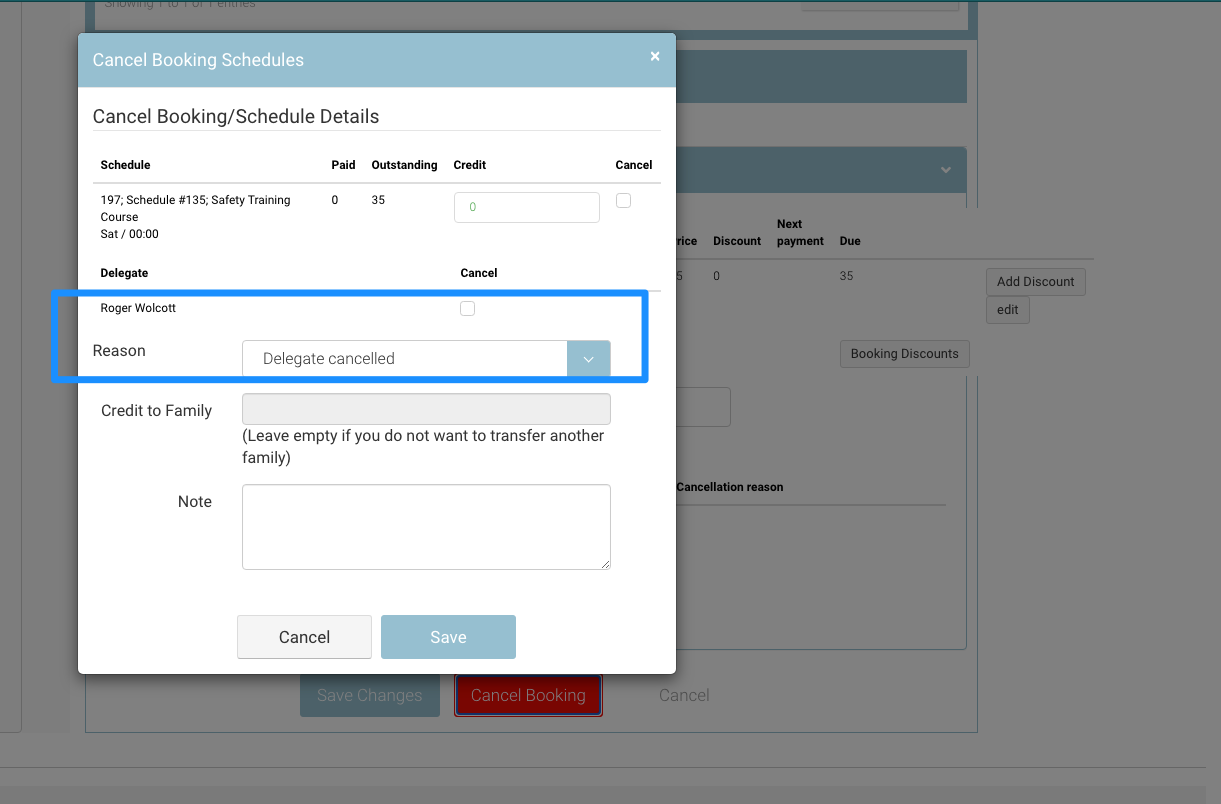
In the pop-up window, select the delegate(s) that you wish to cancel from the Booking
Select the ‘Reason Code’ from the cancellation reason drop-down
Click Save
Outcome:
The delegate(s) will be cancelled from the booking
A new transaction will be created when a delegate is cancelled on the booking
The transaction amount will be based on the no of delegates cancelled on that booking, including discount amount and is sent to AIQ
A reason code will be sent to AIQ for the cancelled delegate(s) i.e. 1 per cancelled transaction
Reason code is mandatory and will be shown on the AIQ invoice
Additional Functionality: Manager Approval of Cancelled Bookings
CourseCo assigned administrators can APPROVE ‘Cancelled Bookings’ before sending the cancellation to AIQ. An Admin can cross check all bookings awaiting approval that have been cancelled by using the report in CourseCo called ‘AIQ cancellation queue’. This report displays all pending cancellation transactions which are not yet approved by the authority of your organisation. Once, the cancellations are approved in this report, they will be synchronised to AIQ.
The report will include columns such as: Booking id, Course name, Schedule id, Schedule name, Lead booker name, Organisation of lead booker, Delegate name(s), Delegate count, Reason code, Cancellation TX id, Cancellation TX Amount, Cancelled Date.
Transfer Booking x AIQ
The Transfer Booking feature is an exceptional feature provided by CourseCo.
With this feature, you can transfer a delegate(s) from one booking to another without any hassle and save time on Admin work.
To transfer a booking and test this scenario, follow these steps:
Navigate to the website
Log In as an admin
Go to the Bookings plugin
Search the Booking ID, Course Name, Schedule Name or start date in the Global search in the Bookings list page that you want to transfer
The search filter will update the page with the matching the bookings
Select the Booking
Click on the ‘Transfer to Another schedule’ Button
You will be presented with a transfer schedule page which will be titled ‘Add a booking’
Select the delegate(s) you want to transfer from the booking on to another schedule
Select a reason to transfer from the transfer reason dropdown
Select the new schedule you want to book the delegate on to
Review the details of the course and booking
Click on Book
Here’s is a screenshot for your reference:
Outcomes:
The delegates will be transferred from one booking to another
Admins can only transfer an upcoming booking
Transferred delegates will be cancelled from the original booking and booked on the new booking
A cancellation transaction will be sent to AIQ with reason code
A new booking and transaction will be sent to AIQ with lead booker name + delegate(s)
Reports like Booking Revenue and Deferred revenue will be updated with cancelled bookings information